How sealing and attic insulation work together to finally cool things down
If your bedrooms upstairs stay warm long after your air conditioner kicks on, the attic above them is likely the problem. Hot air naturally rises, and it pushes down into your living space through gaps in your ceiling, walls, and attic floor, a pattern known as the stack effect. Old or thin insulation lets that pressure win, no matter how hard your AC works. Millers has helped families across Albuquerque and the surrounding area since 1985. The fix isn’t complicated, but it does take doing things in the right order: first close off the gaps letting hot air through, then bring your attic insulation up to a level that can actually hold the line.
The Stack Effect, Explained
Picture your house as a chimney. Air conditioning cools the lower floors, but hot air trapped in the attic presses downward, forcing its way into bedrooms and hallways through any opening it can find. Recessed lighting, plumbing stacks, wiring holes, and attic hatches all create paths for that heat to travel. The higher a room sits in your home, the more it feels this pressure. Homeowners often blame their air conditioner, but an undersized or overworked unit is rarely the root cause. The real issue sits above the ceiling, where gaps and insufficient insulation let heat move exactly where you don’t want it to go.
Where Heat Gets In
Before adding new insulation, it matters to find where air is actually leaking. Top plates, the framing along interior walls, often have small gaps from wiring or plumbing that run straight into the attic. Attic hatches and pull-down stairs rarely seal tight on their own. Knee walls, common in finished attic spaces, hide open cavities that connect directly to unconditioned outdoor air. Each of these spots lets hot air slip past insulation instead of stopping at it. Sealing them first means the insulation added afterward can actually do its job, rather than fighting a losing battle against constant airflow.
Signs Your Attic Insulation Isn’t Keeping Up
A hot upstairs room is usually the most obvious symptom, but it’s rarely the only one. Rooms that feel noticeably warmer or cooler than the rest of the house, energy bills that climb without an obvious cause, and an HVAC system that seems to run constantly without ever quite catching up are all connected to the same root problem. Ceilings that feel warm to the touch, or closets and hallways near the attic hatch that always seem to trap heat, point to insulation and sealing gaps working against you rather than for you. None of these issues fix themselves. They tend to get more noticeable as insulation ages, settles, or shifts out of place, which is why homeowners who’ve lived in the same house for years often notice the problem creeping in gradually rather than appearing all at once.

How Millers Air Seals and Insulates Your Attic
Millers approaches upstairs heat problems in two stages: sealing first, insulating second. Skipping straight to insulation without closing gaps only traps warm air closer to your ceiling. Air sealing is an add-on service, not a step we automatically include with every insulation job, so we’ll walk through whether your attic needs it before any work begins. One thing worth knowing upfront: your attic also needs enough headroom for our crew to move around safely and do the work right. If the space is too tight, we’ll let you know what that means for your options.
When air sealing is part of the plan, our crew inspects the attic floor and top plates before touching a single bag of insulation. Once the space is sealed, we bring your attic insulation up to a depth that matches your home’s needs. It’s a straightforward process, but the order and attention to detail make the difference between an attic that’s still fighting New Mexico’s summer heat and one that finally feels right.
Sealing Bypasses and Top Plates
Small gaps add up fast. We seal wiring penetrations, plumbing stacks, and framing bypasses along the top plates, closing off the paths hot air uses to reach your ceiling. Attic hatches and pull-down stairs get the same treatment, since a poorly sealed entry point can undo work done everywhere else in the attic.
How Millers Assesses Your Attic Before Any Work Begins
Every attic is different, so a plan built for one house rarely fits the next one exactly. Before any sealing or insulation starts, a Certified Energy Expert checks the attic floor to determine current insulation depth, look for gaps around penetrations, and note where knee walls or hatches need attention. This step matters because guessing at what an attic needs, without actually inspecting it, tends to leave gaps unsealed or insulation applied unevenly.
What the Inspection Covers
The walkthrough looks at insulation depth across the entire attic floor, not just a single spot near the hatch, since coverage is rarely even in an attic that hasn’t been touched in years.It also covers the condition of existing insulation, whether knee walls are open to the attic, and whether previous work, like wiring or plumbing updates, left new gaps behind. That information shapes the plan for both sealing and insulation before a single bag of fiberglass gets blown in.
What You Get Afterward
Once the inspection is finished, you get a plan specific to your attic rather than a one-size-fits-all estimate. That estimate includes which areas need sealing first, how much additional insulation depth your attic needs, and what your insulation project will involve from start to finish. Homeowners often expect a longer process than it actually is. Most attic sealing and insulation projects for a single-family home are completed in one to two days, start to finish.
Upgrading to Blown-In Fiberglass Insulation
For existing homes, we install blown-in fiberglass insulation in the attic rather than cellulose. Fiberglass holds its depth over time, while cellulose settles and loses effectiveness. Fiberglass has the added benefit of not carrying the dust that comes with cellulose installations. The result is attic insulation that keeps performing the way it did on day one, long after the job is finished. We don’t install spray foam in existing attics, since it isn’t a safe application for that setting. It’s reserved for new construction, where it can be installed correctly from the start.
Batt insulation is another option some homeowners ask about, since it’s common in walls. In an attic, though, batts leave gaps around irregular framing, vents, and wiring unless they’re cut and fitted with real precision, and even then, small gaps tend to remain. Blown-in fiberglass fills those same spaces completely, flowing around obstacles instead of being cut to fit them. That difference matters more in an attic than almost anywhere else in the house, since attic framing is rarely uniform from one section to the next.
Why R-Value Matters, and Why It Isn’t One-Size-Fits-All
Insulation R-values measure how well the insulation resists heat flow, and it’s the number most homeowners have heard of without necessarily knowing what to do with it. A higher R-value means better resistance to heat moving through it. For attics in central and northern New Mexico, that generally means reaching R-49 or higher, a level built for the heat swings and sun exposure homes seen across our service area. Where your attic actually stands before that target matters too, since current insulation, framing, and how the space is performing all shape the plan. Millers assesses your attic directly and recommends a depth built around what your house needs to reach that R-49 mark, not a one-size figure pulled from a chart. That’s part of why the inspection step matters as much as the installation itself.
What a Well-Insulated Attic Should Look Like
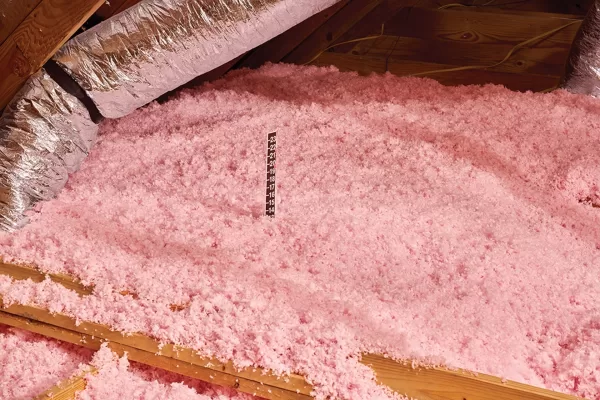
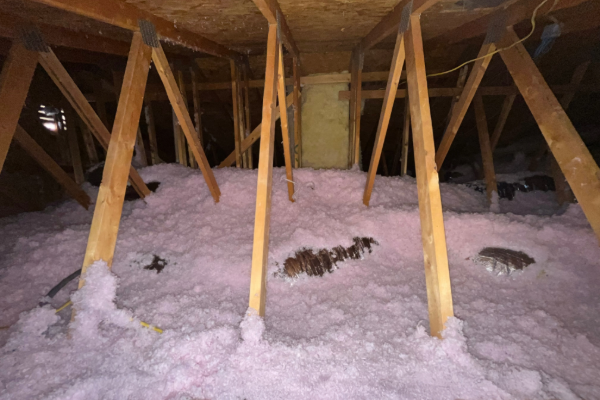
A properly insulated attic has even coverage across the entire floor, with insulation reaching a consistent depth from one end to the other, no thin patches, no bare spots around vents or hatches, and no compressed areas around storage paths. If you can stand in your attic and see the tops of your ceiling joists poking through the insulation, it’s too thin. Insulation should bury the joists completely and look level from wall to wall. Blown-in fiberglass fills in around obstacles and irregular framing more evenly than batts, which is part of why it works so well for attic spaces on existing homes. Millers can take a look at your current attic insulation and let you know exactly where it stands.
Rebates and Attic Insulation Cost FAQ
Are There Rebates For Insulation?
Many attic insulation upgrades qualify for utility or state energy rebates, which reduce your out-of-pocket cost once the work is complete.
How Long Does An Attic Insulation Project Take?
Most single-family attics are sealed and insulated in one visit. Larger attics, more extensive knee wall work, or homes needing significant air sealing before installation can take longer, which is part of why the initial inspection matters — it sets expectations before the work starts rather than partway through.
Attic insulation cost varies based on your home’s size, current insulation levels, and how much air sealing is needed before installation. Rather than guessing at what a project might run, Millers visits your home, inspects the attic, and puts together a plan built around what your space actually needs, not a generic package.
Financing Your Attic Insulation Project
Sealing and insulation both matter for a cooler upstairs, and covering the cost shouldn’t stand in the way of getting there. Millers offers financing options for homeowners who’d rather spread the cost of their project over time instead of paying it all upfront. You can explore financing options here and pair them with any rebates your project qualifies for.
Ready for a Cooler Upstairs?
Millers has served central and northern New Mexico since 1985, and upstairs heat problems are some of the most common calls we get. Improving life and comfort starts with an attic that actually holds up its end of the work.
Contact Millers to schedule an inspection and get a straightforward plan for sealing and insulating your attic the right way.